
Your first setup, step by step
What to do in your first session with OMAI, in the order that works. The setup screens are called Improve your assistant because that is what they do — none of them is required, and connecting WhatsApp is what puts the assistant in front of your customers.
- Who
- Owners and admins
- Plan
- All plans, including the trial
- Role
- Owner or Admin
Before you start
- An OMAI account
- Your opening hours and your main services to hand
- The phone you use for WhatsApp, for the connection step
Your first session has one job: give the assistant enough about your business that its answers are worth sending, and only then let customers reach it. The screens that help you do it are grouped under Improve your assistant — ten steps in six sections. Nothing in them is required and nothing is locked: you can change one thing, or all of them, in any order. This article says what each step does, and where the order the product lists them in is not the order you want.
The order that works
Fill in the business content first, test it in the simulator, and connect WhatsApp last. That is not the order the wizard lists the steps in, and it is worth the small detour.
Your first session
Step 1 Open Overview in the dashboard and select Continue setup.
You should see: The Improve your assistant hub opens on Business details, under the Business info section. The other five sections — Knowledge, Personality, Leads and handover, WhatsApp and Test and summary — are folded beside it, each showing how many of its steps are done.
Step 2 Fill in Business details and select Save and continue.
- Only Business name is required. Business content language decides the language of your knowledge base and the language the assistant replies in by default.
You should see: A Saved. toast appears and the wizard moves to Business hours.
Step 3 Set Business hours for all seven days.
- Every day starts at 09:00–18:00. Tick Closed for the days you are shut, which greys out that row’s times. A day must either be closed or carry both an opening and a closing time.
Step 4 Add your Services, one at a time, with Add service.
- The price field is optional; the currency comes from your organization’s country and is not editable here. Deleting a service asks you to confirm, and the assistant stops using it immediately.
You should see: Each service appears in the list under the form and the assistant may quote it.
Step 5 Add the questions customers repeat, on the FAQ step.
- A question and an answer are both required. Use the wording your customers use, not your internal wording — that is what the search has to match.
Step 6 Add your cancellation and refund rules on the Policies step.
- Optional, but it is the step that lets the assistant answer “what if I cancel?” instead of handing the conversation over.
Step 7 Choose the Tone of voice: Tone of voice, Hebrew style, Emoji and Point of view.
- The shipped defaults are Friendly, Casual, Light and Plural (we).
You should see: The four choices are saved to your assistant settings and change how every reply sounds.
Step 8 Skip ahead to Test the assistant and ask it three real questions.
- The wizard lists WhatsApp connection before Test the assistant. Do it the other way round — test while nobody can reach the number yet.
- Nothing is sent to a customer. See Test simulator.
You should see: Each answer appears with the knowledge-base sources it used, so you can see whether it is reading the right thing.
Step 9 When the answers read the way you want, open WhatsApp connection and follow it through to the WhatsApp screen.
- Connecting is its own procedure, with its own prerequisites: Connect your number with Embedded Signup.
You should see: Once Meta finishes, you land on a confirmation page saying your assistant is live on that number — and from that moment it answers the customers who message it.
Step 10 Watch the first real conversations arrive, and come back to the hub to fix whatever they show you.
- A wrong answer almost always means a missing FAQ or a price the assistant never had.
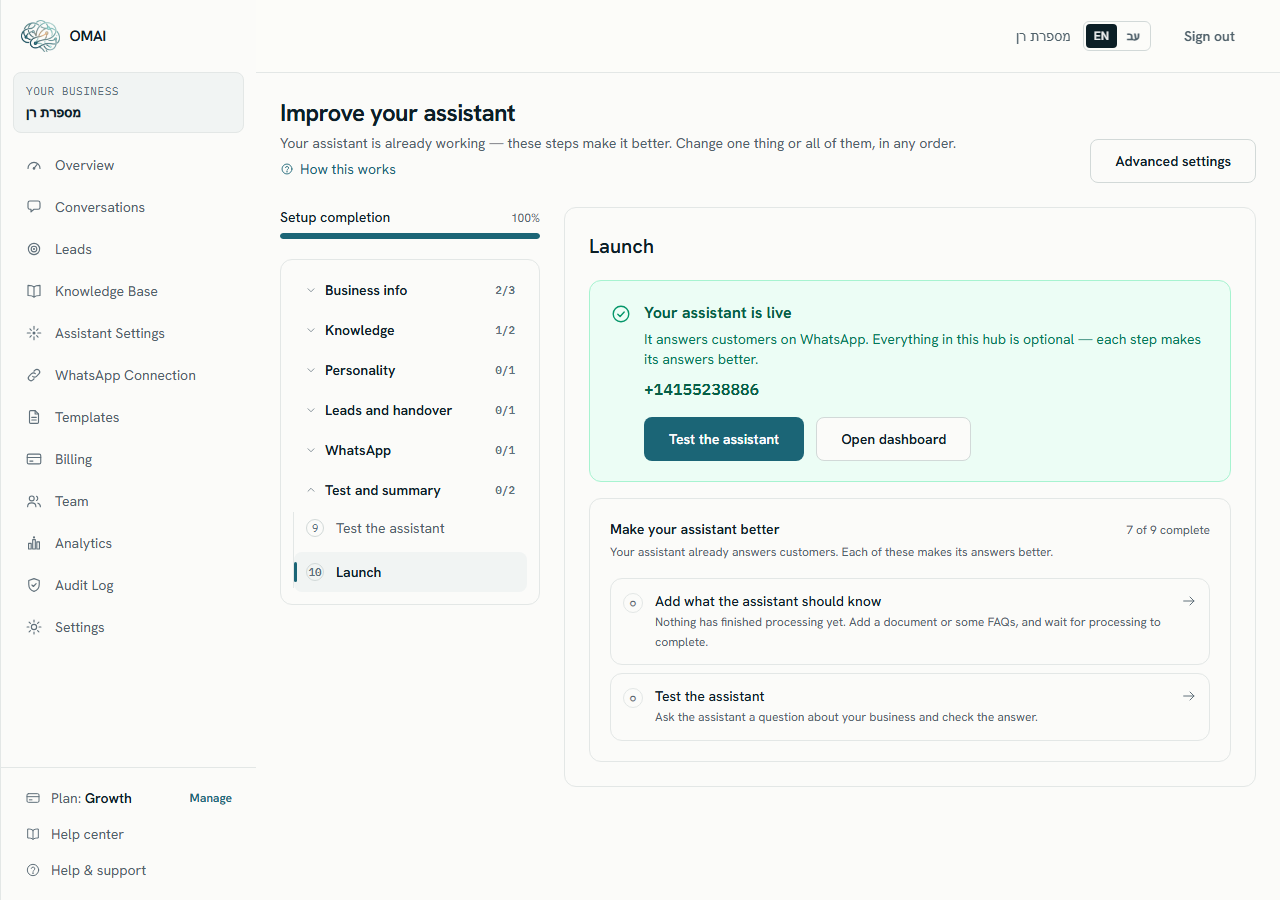
You should see: The last step of the hub confirms the assistant is live and lists what is still worth adding. Nothing there has to be pressed.
Opening the hub later
The hub is not in the left navigation. You reach it from Overview (the Continue setup button while the account is new, or See all steps on the Improve your assistant strip once the assistant is live), from the Setup wizard button at the top of Assistant settings, from the page you land on after connecting WhatsApp, and from the checklist links, which open it directly on the step they are about. Two sections also link straight out to the fuller screens behind them: Upload documents goes to the knowledge base, and Team and handover goes to the team screen.
What each step writes
| Step | What you enter | Where it goes |
|---|---|---|
| Business details | Business name, industry, phone, website, city, address, business content language, short description | Name, city, address and description go to your business profile; the content language goes to the organization. Industry, phone and website are stored with your setup answers only — nothing reads them. |
| Business hours | Open and close times for each of the seven days, or Closed | Your weekly hours, which decide whether you count as open when a customer writes. |
| Services | A service name and an optional price | Your service list. These are the names and prices the assistant is allowed to quote. |
| FAQ | A question and its answer | Your approved answers, searchable by the assistant. |
| Policies | A type, an optional title and the policy text | Your policies: cancellations, refunds, appointments, privacy or other. |
| Tone of voice | Tone of voice, Hebrew style, Emoji, Point of view | Assistant settings — how the replies sound. |
| WhatsApp connection | Nothing — a status, a link and a Got it, continue button | Marks the step done. The connection itself is made on the WhatsApp screen. |
| Test the assistant | A test message | Nothing is stored as a conversation. Sending a test raises the tested-questions count that the pre-launch check reads. |
| Launch | Nothing | A summary. For an assistant that is already live it confirms so and offers a test; for an account with no number it points at the connect screen. |
Field limits you will meet
| Field | Maximum |
|---|---|
| Business name | 160 characters |
| Short business description | 2,000 characters |
| Service name | 160 characters |
| FAQ question | 500 characters |
| FAQ answer | 4,000 characters |
| Policy content | 8,000 characters |
| Business hours | Seven rows, one per day |
There is no cap on how many services, FAQs or policies you may add. Your plan caps knowledge storage instead — 125 MB on Starter, 400 MB on Growth, 1,250 MB on Pro.
Saving, and what the progress bar means
- Every form carries two buttons: Save and continue moves you to the next step, Save only stays put. Both save.
- A successful save shows a Saved. toast. A rejected save shows red text under the field that caused it and moves the cursor there.
- The Setup completion bar counts completed steps out of ten, and the tenth is the summary step — which a live assistant has nothing to press on. So an account that never pressed the older launch control sits at 90% however complete it is. That is cosmetic: the bar measures the hub, not the assistant.
- Services, FAQ and policies are counted from the live lists, not from what you typed — delete your last service and that step stops counting as done.
- WhatsApp connection and Test the assistant are marked complete by their Got it, continue and Tested, continue buttons, which check nothing. The nine-step Before you go live list is the one that verifies.
Who can open the hub
The hub writes organization settings, so it is limited to the Owner and Admin roles. An Agent or a Viewer who opens the address is told in words that the hub is limited to owners and admins, and pointed back to the Overview — no step, no saved value and no progress figure is shown. Roles and permissions lists what each role may do.
The last step: Test and summary
The hub’s last section holds the test simulator and a summary, and what the summary shows depends on where your account actually is. It never gates anything.
- Assistant already live: Your assistant is live, the connected number, a Test the assistant button and a link back to the dashboard, with the Before you go live list underneath as advice.
- No number connected yet: the same list, and one Connect WhatsApp to go live button.
- A number connected but the setup behind it unfinished: the older launch control, above the informational pre-launch check (knowledge added, WhatsApp connected, at least 3 test questions asked).
- Whichever you see, nothing here changes what customers experience. Answering was decided when the number connected.
Where to go next
- Work through Before you let customers in: a checklist before you connect the number.
- Add documents — price lists, brochures, terms — in Business knowledge, which covers far more than the wizard’s two lists.
- Decide what happens outside your opening hours in Business hours and after-hours replies.
- Invite the people who will take conversations over: Invite your team.
Do I have to finish these steps before customers can be answered?
No. The assistant answers as soon as a number is connected, however empty the hub is. Finishing the steps is what makes the answers good — with nothing entered, the assistant tells the customer it does not have that information rather than inventing it, which is safe but not much use.
The bar says 80% and I have done everything. What is missing?
Almost certainly nothing. The bar counts ten milestones and two of them cannot be earned in the hub: the summary step, which a live assistant has nothing to press, and a retired step about leads — the assistant now captures leads on its own, with nothing to configure. The list that actually reports your state is Before you go live, on that same step and on the dashboard.
I changed the business content language. Do I need to re-add anything?
No. The field is saved immediately and takes effect for new replies. It does not reprocess what is already in your knowledge base, so mixed-language content stays exactly as you entered it.
The hub used to have a step about leads. Where did it go?
It was retired. It stored settings that nothing in the product read. Today the assistant captures leads automatically from conversations that show real buying interest — there is nothing to configure. See Leads.